How to Create a Fillable PDF Form Online (Free)
5 min read
Turn any PDF into a fillable form with text fields, checkboxes, radio buttons and dropdowns. Place, name and save the fields in your browser, no upload.
A form that people print, fill in by hand and scan back is slow for everyone. A fillable PDF lets them type directly into boxes, tick options and choose from a list, on a computer or phone, and send it back as a file. If you already have the layout as a PDF, whether you designed it in Word, a design tool or received it as a flat page, you can add the fields yourself.
This guide shows how to do that with PDF Form Builder: which field types you can add, how to set them up, and what to test before you send the form out. The tool is free and runs in your browser.
Step by step
- Open PDF Form Builder and click Choose a PDF.
- Pick the kind of field in the toolbar: text field, checkbox field, dropdown field or radio field.
- Drag on the page, over the empty space where the answer should go. The field appears at that size.
- Set its properties in the panel on the right.
- Repeat for every field, using the page list on the left to move between pages.
- Click Save fillable PDF to build and download the form.
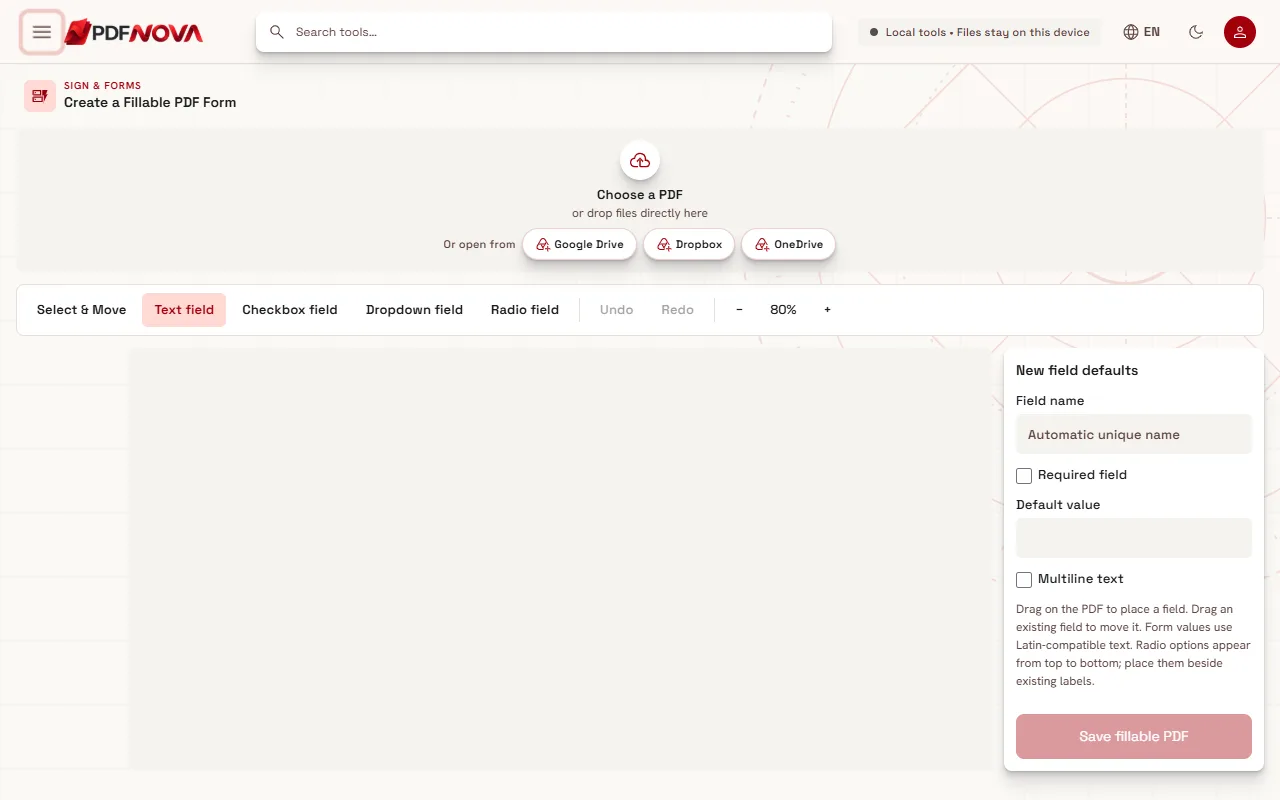
When a PDF is loaded, the page appears in the centre, the toolbar sits above it, and the properties panel is on the right. A list under the panel, labelled Form fields, shows each field you added with its page number.
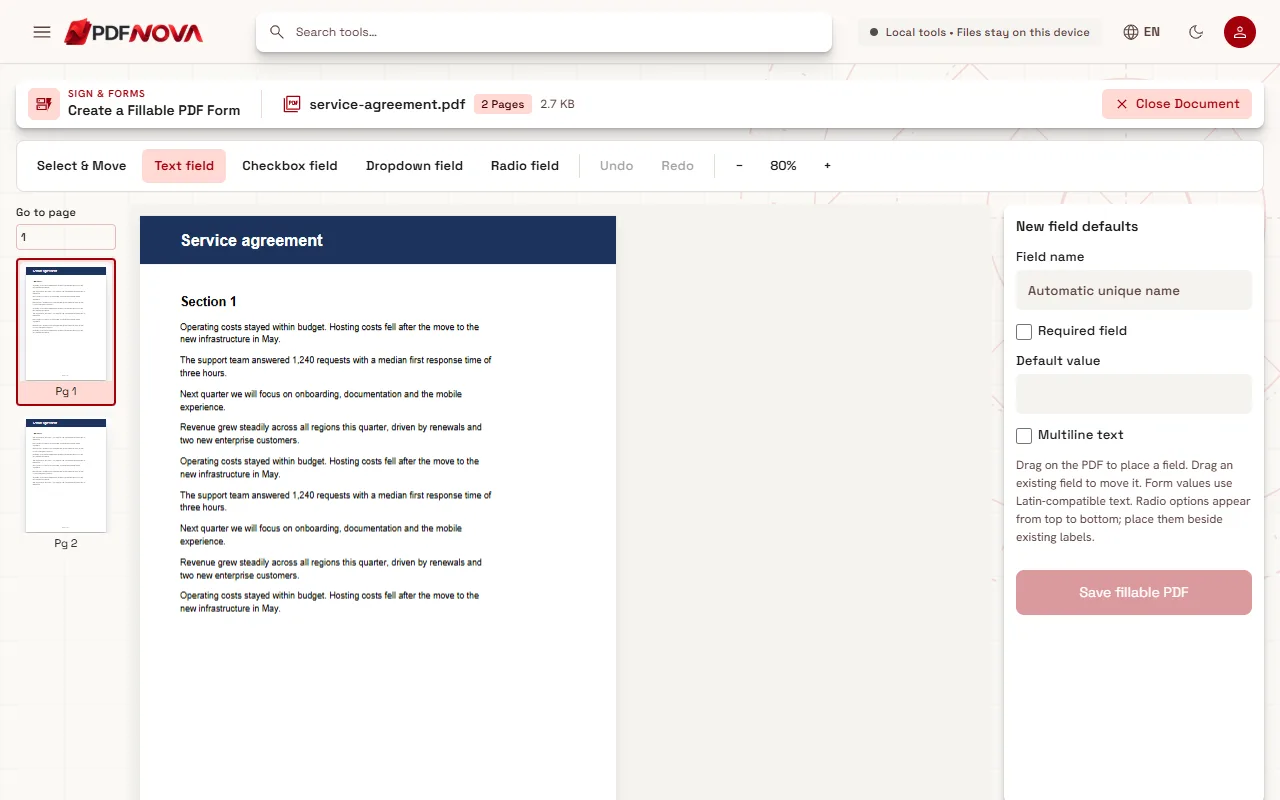
The four field types
- Text field. For names, dates, addresses and short answers. Tick Multiline text for a larger box where people can write several lines, and use Default value to prefill it.
- Checkbox field. For yes or no. Checked by default decides whether it starts ticked.
- Dropdown field. A list the person chooses from. Write the choices in Options (one per line); a new dropdown starts with "Option 1" and "Option 2" that you replace.
- Radio field. One choice among several. Each option is listed in the options box, and the options appear from top to bottom, so place the field beside the labels already printed on the page.
Other kinds of field, such as buttons, signature fields or calculated fields, are not offered. If people need to sign, they can sign the completed file afterwards; see signing a PDF without printing.
Field properties that matter
Select a field to edit it. With nothing selected, the same panel is titled New field defaults and applies to the next field you draw.
- Field name. Leave it empty and a unique name is generated. Choose your own names when you will read the answers later, for example in a spreadsheet; keep them short and without surprises.
- Required field. Marks the field as mandatory, so readers that support it will warn the filler who skips it.
- Default value and Options as described above.
- Delete field removes the selected field. Use Select & Move to drag a field to a new place or resize it, and Undo and Redo if you change your mind. The zoom buttons help to place fields precisely on dense pages.
A few design habits that help
Draw each box slightly smaller than the printed line or frame, so text does not touch the border. Put checkboxes beside their labels with room to click. Group related radio options in a clear column. For a long form, add fields page by page and save a copy now and then in case you want to go back.
Remember that the tool adds fields to a page that exists; it does not draw the labels. If you need a blank starting point, create the layout first with Create PDF, or export a PDF from your word processor. The guide on PDF vs Word explains why a fixed PDF is the right base for a form.
Test the form before you send it
- Open the saved file in Fill PDF Form. All your fields should be listed, grouped by page.
- Fill every field, including one test run of each dropdown and radio option.
- Save the result and reopen it in another PDF reader if you can, such as a browser or a phone app.
Filling is covered in how to fill in a PDF form, which is also the guide to send to people who ask how to complete your form.
Limits to know
- Standard AcroForm fields only. They work in readers that support PDF forms. Older XFA forms and certificate signing are not part of this tool.
- Latin-compatible text. The help text in the tool says form values use Latin-compatible text, so answers in other writing systems are not supported.
- Existing fields stay, but are not editable here. If your PDF already has fields, they are preserved; this tool adds new fields.
- Radio labels must already be on the page. The tool places the radio buttons; it does not write their captions.
- Do not rely on a form for security. Anyone with the file can read what it contains. Protect sensitive forms with a password; see protecting a PDF with a password.
Privacy
PDF Form Builder runs in your browser. The PDF is read from your device, the fields are added in memory and the result is saved back to your device. The file is not uploaded to a server.
FAQ
Is PDF Form Builder free?
Yes. It is included in the free plan and needs no account.
Can the person filling it use any PDF reader?
Fields are standard PDF form fields, so readers that support PDF forms can fill them, including browsers and mobile PDF apps. Behaviour such as required-field warnings can vary between readers.
Can I add a field to a scanned page?
Yes, the fields sit on top of the page like any other PDF. The scan itself stays a picture; to make its text searchable, see making a scanned PDF searchable.
How do I edit a form I created?
Open the saved file in the builder again to add more fields. To change the printed text of the page, use Edit PDF.