Convert PDF Pages to JPG or PNG, or Extract Their Images
6 min read
Turn PDF pages into JPG, PNG or WebP images, or save the pictures stored inside a PDF. Learn DPI choices and page images versus embedded images.
"I need this PDF as an image" can mean two quite different things. Sometimes you want a picture of a whole page, for a slide, a social post or a chat message. Other times you want the photos and graphics that were placed inside the document, in their original form. PDF NOVA has separate tools for each job, and choosing the right one saves a lot of fuss.
This guide explains both: PDF to JPG and PDF to PNG for page images, and Extract Images from PDF for the pictures embedded in the file.
Page images versus embedded images
A page image is a rendering of a page. Text, shapes, photos and background are all flattened into one picture of the page at a resolution you choose. It looks like the page, but the text is no longer text.
An embedded image is a picture that was stored inside the PDF, such as a photo in a brochure or the scan that makes up a scanned page. Extracting it gives you that picture, not the page around it.
Use a page image when you want the page as it looks. Use image extraction when you want the photos themselves, for example to reuse a product picture. If the PDF is a scan, the two overlap: a scanned page is one big picture of the whole page, so extracting it gives you the page photograph.
Step by step: convert pages to images
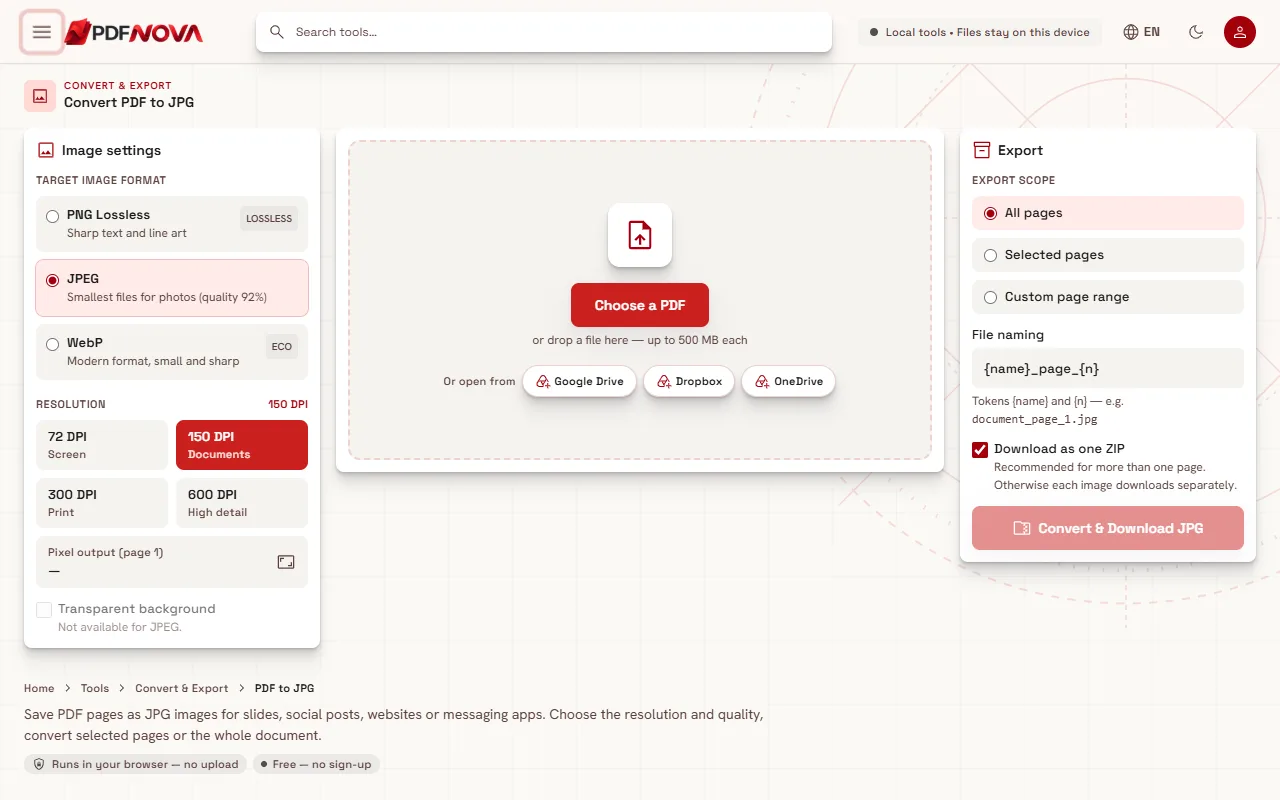
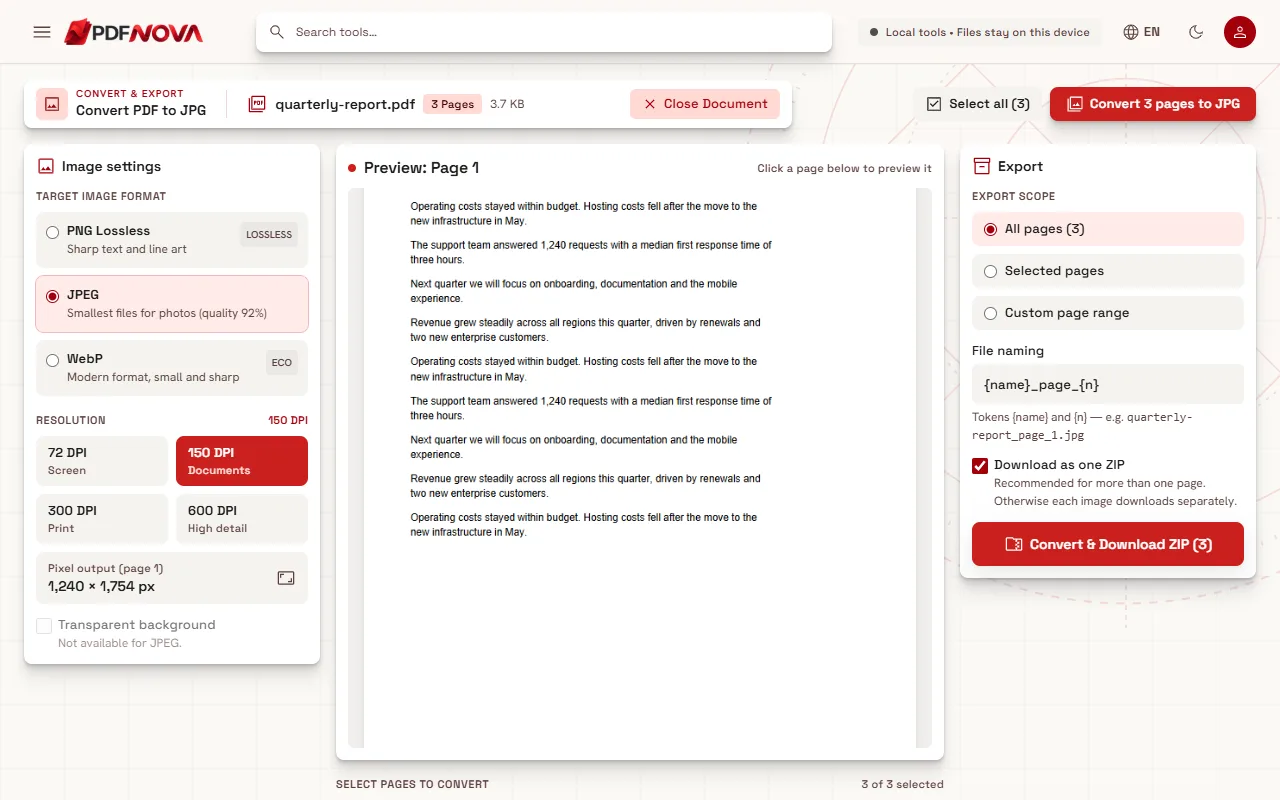
- Open PDF to JPG (or PDF to PNG, which uses the same workspace) and choose your PDF.
- Under Target image format pick PNG Lossless, JPEG or WebP.
- Under Resolution pick a DPI (see the next section).
- Click pages in the page strip to preview them. The preview is titled "Preview: Page N", and the line "N of M selected" tells you how many pages will be converted. Select all selects every page.
- In the Export panel, choose Selected pages or Custom page range (for example `1-3, 5`).
- Optionally edit File naming. The field accepts the tokens `{name}` and `{n}`, for the document name and the page number.
- Leave Download as one ZIP on for several pages, or turn it off so each image downloads separately.
- Select the main button. It reads Convert & Download followed by the format, or Convert & Download ZIP with the page count when you export several pages as a ZIP.
Choosing the format
- PNG Lossless keeps text and line art sharp, with no compression artefacts. It is the right choice for screenshots, diagrams and pages that are mostly text. PNG files of photographic pages can be large.
- JPEG gives the smallest files for photographs. The quality is fixed at 92%, so there is no quality slider to adjust. Fine text can show slight softness around the edges when you zoom in.
- WebP is a modern format that is small and sharp. Check that the place you will use it supports WebP before relying on it.
If you are unsure, use PNG for pages with text and JPEG for pages dominated by photos.
Choosing the resolution
Resolution is set in DPI (dots per inch). The workspace offers four steps:
- 72 DPI (Screen) gives small images for a quick look or a web thumbnail.
- 150 DPI (Documents) is the default and suits most uses such as slides, email and documents on screen.
- 300 DPI (Print) is for pages that will be printed or zoomed into.
- 600 DPI (High detail) is for fine detail, and produces very large images.
The line Pixel output (page N) shows the exact width and height in pixels before you convert. The pixel size is the page size in points divided by 72, multiplied by the DPI, so an A4 page (about 595 by 842 points) at 150 DPI comes out around 1240 by 1754 pixels. Higher DPI means a sharper image, a bigger file and more memory use in your browser.
Very large pages are capped at about 36 megapixels to stay within browser limits. If your browser still cannot create the image, the workspace says so and suggests a lower DPI.
Transparent background
For PNG and WebP you can switch on Transparent background, which leaves the page background transparent instead of white. This is handy for placing a diagram on a coloured slide. It is not available for JPEG, which cannot store transparency.
Step by step: extract the pictures stored in a PDF
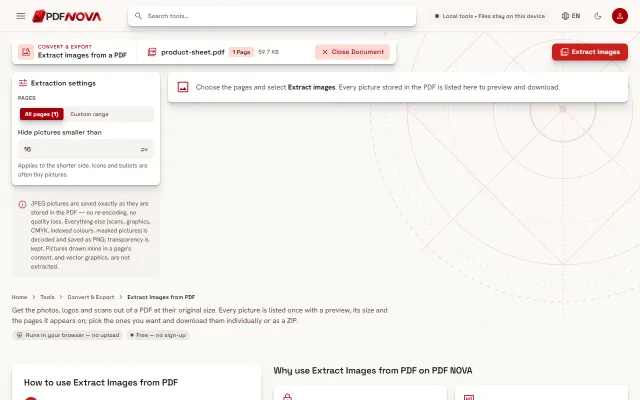
- Open Extract Images from PDF and choose your file.
- In Extraction settings, choose whether to read all pages or a range.
- Set Hide pictures smaller than (in px). It applies to the shorter side of each picture and helps you skip icons, bullets and other tiny graphics.
- Select Extract images. Progress messages such as "Decoding pictures on page 3 of 10" show how far it has got.
- In Images found, each picture shows its number, pixel size, file size and the pages it appears on. Select the pictures you want with Select all or Select none, then use Download image for one picture or the ZIP download for several.
How a picture is saved depends on how the PDF stores it. JPEG pictures are saved exactly as stored, with no re-encoding and no quality loss, and the card says "JPG, as stored in the PDF". Everything else, such as scans, graphics, CMYK or indexed-colour pictures and masked pictures, is decoded and saved as PNG, with transparency kept. The card says "PNG from" followed by the way the PDF stored the pixels.
Two limits are worth knowing. Pictures drawn inline in a page's content, and vector graphics such as logos and charts, are not extracted. A vector chart therefore will not appear in the list; use a page image if you need it. Also, a very large picture cannot be decoded in the browser, and the tool lists it among the pictures that could not be extracted, with the reason.
Common problems and fixes
- "No pictures were found on these pages." Pages made only of text and vector graphics contain no pictures. Try a page image instead.
- Every picture is hidden. Lower the Hide pictures smaller than value.
- The conversion fails on a large page. Lower the DPI.
- The images are blurry. Raise the DPI, and prefer PNG for text. If the PDF itself was built from a low-resolution scan, no setting can add detail that is not there.
- Text in the image cannot be selected. That is expected: an image is a picture. If you need text from a scan, use OCR PDF, as described in making a scanned PDF searchable.
Related guides
To turn images back into a PDF, see photos to PDF. To make a PDF smaller, read compressing a PDF without losing quality. If you only need a few pages, splitting a PDF and extracting pages is the quicker route.
Privacy: does my file leave my device?
PDF to JPG, PDF to PNG and Extract Images from PDF all process locally. The PDF is read and the images are made in your browser, so the document is not uploaded.
FAQ
Which is better for print, JPG or PNG?
For print, choose 300 DPI. PNG keeps text sharp, while JPEG is smaller for photographic pages.
Can I convert only some pages?
Yes. Click the pages you want, or enter a custom page range such as `1-3, 5`.
Do extracted JPEGs lose quality?
No. JPEG pictures are saved exactly as stored in the PDF.
Can I get the text from an image?
Not from the image itself. Run OCR on the PDF, or use the PDF text tools if the original has selectable text.